DEDICATION

This blog is dedicated to the restoration of the Austin Healey 3000...among the most desirable of all British sports cars.

Friday, March 30, 2012

STILL PATCHING LITTLE HOLES

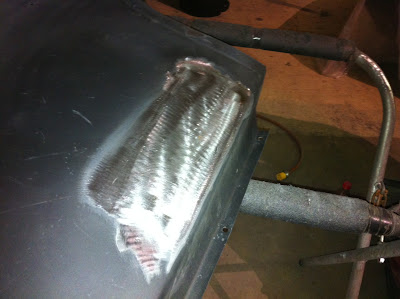
We have only four small patches remaining to be repaired.  Today, we patched some small "pin holes" in two of the fenders where  dirt and water had collected over the years.  
Very little filler will be required to prepare this fender for painting.


Paxton, shown in the photo to the left is tack welding the new metal to the fender.  The man is an artist.


After the welds are ground down to the proper level, the patch can barely be detected.  That is what we call "Paxton perfect".  


Stay tuned,
Tom McCurry

Wednesday, March 28, 2012

TRANSMISSION DELIVERED TODAY

Our good friend Tom Ray brought the transmission to us today and if you can believe it, in the trunk of a Lexus.  It was one thing getting it in the trunk and quite another getting it out.  Once again, the team effort made it possible.  
Tom spent a couple of hours in the shop this evening checking out the car. I think he too may have "Healey fever" although he will not admit it.


Paxton came over again this evening and worked more of his magic some of the minor rust issues. There are only a few left and then we are ready to make this car RED.  I realize that I am only one of many that would like to see this car painted, but we will not rush it.  Perfection takes a bit longer.  
Check us out tomorrow.  I will post pictures of Paxton's welding expertise...beautiful workmanship.  

Later,
Tom McCurry


Tuesday, March 27, 2012

STRUCTURAL WELDS DRESSED AND IN PRIMER


Today, we put the finishing touches on the door frames on both sides of the car.  The welds on the door latch panel and underlying structure, shown in the photo to the left, have been dressed, filled and primed.


Dressing the driver's side, shown in the photo to the left,  was a bit more difficult.  You will recall, a great deal of the structure was replaced.  More welding and fitting was done requiring more body work.  The finished product looks great.


All the necessary welds were done in the same manner, with the same spacing as the original welds so that no one will ever know it was repaired...well, no one except for you and me.

Later,
Tom McCurry

Monday, March 26, 2012

BODY WORK CONTINUES


The body work is probably over fifty percent complete.  Most of the damaged areas on the fenders and doors have been completed.  The driver's side repairs, shown to the right are complete except for some collision damage on the fender near the top of the door.  


The passenger's side, on the left, had several small dents on the rear fender and the patch panel in front of the rear wheel that required filler.  Only a minimal amount of filler was used.  


After the epoxy primer is applied to the areas that required body work, the car is ready for the application of high build primer and final blocking.


Driver's side patch panel in place, filled and primed.


I love this car...

Later,

Thursday, March 22, 2012

DRIVER'S SIDE WELDING COMPLETED

Today, the body work continued.  I have about a third of it done and ready for primer.  The body work on the fender patch panel on the passenger's side, shown in the photo to the right, has been completed.  


 Paxton has fitted the fender patch panel on the driver's side as shown in the photo to the left.  This side had sustained some damage and is a bit more difficult to repair.  


The photo to the right shows the patch panel welded in place.  This is the last of the body patch panels to be fitted.  A bit more body work will be required before priming.  


Tomorrow, Don and I will pick up the newly restored engine.  The engine has been restored to its original specification making only the necessary modifications.  These modifications will certainly improve the engine's performance.  Hopefully, I will have the time to post tomorrow.

Stay tuned,
Tom McCurry

Wednesday, March 21, 2012

BODY WORK BEGINS

The body of this Healey is in incredible condition.  There were maybe a dozen "dings" and only two dents no larger than a lemon in the steel panels.  I spent the day working out the dents and filling the "dings" with glazing putty.  There will be no "bondo" in this car.  The larger dents were "worked" so only a thin coat of glazing putty will be required prior to painting.  


What appears to be "large" dents, shown in the photo to the left, are actually only door dings. The application of high build primer and blocking is required before final painting.  


There was a small crease just below the body line in the driver's door.  The first application of glazing putty is shown in the photo to the right.  Blocking, priming and more blocking is required.


Stay tuned,
Tom McCurry

Tuesday, March 20, 2012

BODY PANELS FITTED

With the new hinge finally in hand, we hung the passenger's door (again) and fitted both rear fenders.  


I began the dent removal process and should have them done by the close of business tomorrow.  Paxton, shown in the photo to the left, is fitting the new rocker panel in place.  At the end of the evening, most of the welding was completed.  Only the rear fender patch panel remains to be fitted.


Tomorrow...more of the same.
Tom McCurry

Saturday, March 17, 2012

WELDING COMPLETED ON DRIVER'S LATCH PANEL

After making all the necessary adjustments in the structure surrounding the driver's door, Paxton located the latch panel and welded it in place.  Also he put the final touches on the wheel house. 


Monday morning we will mount the rear fender on the driver's side and Paxton will weld the patch panel in place in the afternoon.  

Later,
Tom McCurry 

Friday, March 16, 2012

YET ANOTHER PRODUCTIVE DAY

This morning we discovered one of the new door hinges we had been waiting on was not the correct one for this car.  I immediately called Tim and he took care of the situation.  We will have the correct hinge on Monday.  But we went ahead as planned. 
We had two operations scheduled for today.  First, we needed to fit both front fenders and both doors.  Second, the aluminum body panels needed to be prepped and primed.  
Although we were short one of the necessary hinges, we made it work.  Using the best of the old hinges, we installed it on the passenger's door.  The driver's door was fitted with the original hinges from the passenger's side.  For our purposes today, this will work.  We can change the slightly damaged hinge when we receive the new one on Monday. 

With the fenders and doors in place, the welding on the driver's side latch panel can be completed.


With the front cowl panel missing from the equation, we used threaded rods to maintain the correct spacing of the front fenders.  


We purchased a special cleaner and prep for the aluminum panels and it was delivered at noon today.  


  Both panels were cleaned and primer was applied.  Saturday morning, the body panels, with the exception of the front cowl, will be installed and  Paxton will be finishing the welding on the driver's side.


Check back tomorrow for the latest.

Tom McCurry

Thursday, March 15, 2012

I KNOW YOU'VE BEEN WAITING FOR THIS MOMENT

No one on this earth, with one possible exception, wants to see this car in primer more that I.   We have spent hours sandblasting, stripping, hand sanding, and cleaning.  Today, we applied epoxy primer to the chassis, trunk and cockpit area.  


Primer was also applied to the remainder of the undercarriage.  


The passenger's side is complete and we are ready to hang the door and fenders.


c
Paint removal and surface prep in the trunk was the most difficult.  At some point in time this space had been repainted with a brush.  They must have used a quart of paint.  More is not necessarily better.  Looks good now.


Tomorrow morning, the aluminum panels; the front cowl and the rear shroud assembly shown in the photo above will be prepped and coated with epoxy primer.  This will complete the epoxy primer phase of the restoration.  After the primer is sufficiently cured, the doors and fenders will be fitted to the chassis in order to properly locate the driver's side door latch panel.  
The body work will begin this weekend.

Enjoy...
Tom McCurry


Wednesday, March 14, 2012

READY FOR PRIMER

Our day was spent putting the final touches on the chassis.  The final clean will be done tomorrow morning.  By the end of the day the entire car, body panels and chassis will be in primer.  How exciting is that!  Can't wait to post those pictures.
On Friday, we will begin assembling the body panels to the chassis.  We are "rough fitting" the body panels to assure proper alignment of doors and fender before the final welding on the driver's door frame is completed.   You can be sure those pictures will be posted.  

Love my job...
Tom McCurry

Tuesday, March 13, 2012

SANDBLASTING COMPLETED

The sandblasting was completed today in preparation of the first coat of primer.  We will spend tomorrow morning touching up a few areas where the paint would not release, but by noon I will be applying epoxy primer to the remainder of the car.  


"Still a few areas to be cleaned up" as shown in the photo to the left.  Other than that, the body is ready to prime.


The car will be black tomorrow and ready to rough fit the doors and fenders on Thursday.

I love this car...
Tom McCurry


Monday, March 12, 2012

BODY PANELS IN PRIMER

A beautiful thing!  All the fenders, doors, boot and bonnet are in primer.


We have ordered two new door hinges for the driver's door because they were badly worn and could not be repaired.  They should be received tomorrow.


The final sandblasting was almost completed today.  Just a small amount in the trunk and the cockpit remains.  


By the close of business tomorrow, the cleaning process will begin on the sandblasted areas and they will be primed on Wednesday.  


Rough fitting of the doors and fenders will commence after the priming is complete.  

Stay tuned,
Tom McCurry

Saturday, March 10, 2012

EPOXY PRIMER APPLIED TO BODY PANELS


After hours of stripping and cleaning the body panels, the epoxy primer is being applied.  And now that most of the welding is done, the sandblasting can be completed.  The photo to the left is the underside of the cowl; the oval is the opening for the grille.


The photo to the right is the right front fender.  There are very few issues with this panel.  It will be an easy repair.


The photo to the left shows the passengers door and the  transmission tunnel.  Both these panels are also in excellent condition.


The trunk lid, or boot, and the hood, or bonnet, have both been primed on both sides.  The bonnet is in excellent condition but the boot will require a bit of rust repair near the bottom edge.  Nothing major though.


Monday morning, the rest of the body panels will be primed and the sandblasting will continue.  The trunk space and about a third of the undercarriage require sandblasting.  It should not require a lot of time.

Check back...
Tom McCurry


Thursday, March 8, 2012

STILL WORKING ON THE DRIVER'S DOOR


When aligning the door latch panel, all the adjacent body parts must be installed in order to locate it in the proper position.  The margins between the door, fenders and rocker are critical.  Today, after installing both fenders and the door, I was able to locate the new rocker.  Further adjustments are required prior to the final welding process.


 To give you some kind of idea how this area looked before we began the process of restoring it, I have included the photo to the right.


The photo to the left clearly indicates the extent of the work.  Basically, very little of the original structure remains.  


Tomorrow we are applying epoxy primer to some of the remaining body parts and will try to complete the driver's door restoration.

Stay tuned,
Tom McCurry

Tuesday, March 6, 2012

DRIVER'S SIDE RESTORATION

It is so exciting watching this car come together.  As I posted the other day, I had fabricated the necessary patch panels for the installation of the driver's door latch panel.  If you recall, the driver's side had sustained minor collision damage which had not been repaired properly making alignment of the door, fenders and rocker a bit time consuming.  As shown in the photo to the right, the patch panel I fabricated to repair the door sill box frame was installed this afternoon.


Paxton also installed a small patch panel to repair a small area that had rusted through.  Now the wheel house is solid, rust free and ready for primer.


Next, we fitted the patch panel required to mount the door latch panel.  It is imperative that this panel be aligned perfectly.  It locates the door latch assembly which will not operate properly unless it is mounted correctly.
Here we are concerned with fractions of a millimeter.  


By the close of business tomorrow, the driver's side will probably be repaired.  Check with us tomorrow.

I love my work,
Tom McCurry

Monday, March 5, 2012

A DAY OFF FOR A WORTHY CAUSE

After working sixteen days in a row, I needed a break.  I played in a benefit golf tournament today for an organization called Volunteers In Medicine, or VIM.  This is a terrific organization, and its volunteer staff members are saints.  They are a local organization that makes free health care available to those who cannot afford it.  I didn't realize until today that over 70% of VIM's patients are employed.  That is sad.  This blog is not a forum for politics, but something needs to be done about health care in this country and it seems to me that these people have found the solution and they deserve our support.  Please check them out.
Although, I had fun today, Don was busy.  He finished removing the paint from the underside of the front cowl.  Now, the left rear fender is the only remaining part that needs to be stripped and prepped for primer.  Bill is coming in tomorrow and will complete this task by close of business.    
Paxton will be welding the new patch panels in place tomorrow afternoon.  By the end of the week, the car should be ready for the application of the final coat of epoxy primer.  The weather is a major factor here because additional sandblasting must be completed before the final priming can be done.  We should be ready to apply the final finish to the frame and engine bay by the end of next week.

I love this car.
Tom McCurry

Sunday, March 4, 2012

DRIVERS SIDE REPAIRS

Yesterday, Paxton and I spent several hours aligning the driver's side door and wheel house area that had previously sustained some collision damage.  It only took a couple of hours to straighten the door frame.  The previous repairs had been not been done correctly.  Now the door frame and wheel house are "Paxton perfect".  
I fabricated the patch panels to replace the damaged metal that was removed.  
There was also a bit of rust damage in the wheelhouse.  You will notice, in the first photo, the new metal that was welded  in place.  

After the repairs to the wheel house and door sill were made, I fabricated another patch panel to "box in" the sill frame and applied primer to the inside of box frame.  This new panel will be welded in place tomorrow.  A new latch panel support has been fabricated and will be welded in place directly over the box frame panel.  The repair will be better that original.  


After the latch panel support is permanently attached, the new latch panel and rocker will be properly located and welded in place.  This will complete the repairs to the driver's side.

More to come....
Tom McCurry


Saturday, March 3, 2012

SHEET METAL REPAIR IN TRUNK

Probably at some point in time the battery, which is located in the trunk, was damaged in some way resulting in damage to the trunk floor.  When we were removing the fuel tank, we noticed a copper plate screwed to the floor.  Removing the plate revealed some damage to the trunk floor pan and frame. In the photo to the right you will notice that the damage to the frame is not severe, but repair is required.  


A gusset of 16 gauge sheet metal, shown in the photo to the left, was fabricated to strengthen the frame.  It will be stitch and spot welded to the existing frame.  After the welding is complete, the frame will be stronger than it was originally, and the repair will not be visible at any angle.


The photo to the right shows the patch panel that was fabricated to repair the trunk floor.  It will be stitch welded to the existing floor and spot welded to the frame.  The welds will be ground off level. When the surfaces are sandblasted and a small amount of filler and epoxy primer is applied, the repairs will be invisible from all angles.  


Today, Paxton has been working straightening and aligning the door structure and adjacent wheel house.  The damage to the door frame and wheel house was the result of collision damage which probably occurred in the early years of this car's existence and was not repaired correctly.  Photos of this work will be posted tomorrow.

I love work,
Tom McCurry