DEDICATION

This blog is dedicated to the restoration of the Austin Healey 3000...among the most desirable of all British sports cars.

Monday, April 30, 2012

BODY WORK AND WELDING CONTINUES

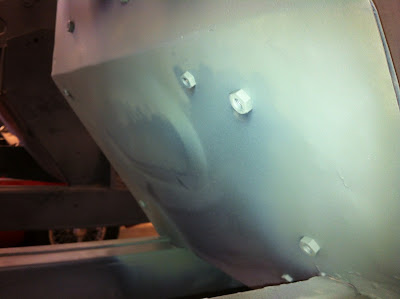
I know it seems that we have been welding on this car forever, but we continue to find small areas on the chassis that require attention,  For instance, shown in the photo to the right is the new floor pan section that was just welded in place.  During our preliminary inspection, we had determined the damage to the panel was minimal.  A closer inspection revealed that the entire panel had been weakened.  


The other side of the panel is shown in the photo to the left.  If you will notice, there are five captured nuts that hold the heat shield panel in place.  Since this area is exposed to the elements, moisture was trapped between the heat shield and the floor panel,  resulting in the general weakening of the panel.  Fortunately, the repair panel was available at a very reasonable price  It caused a short delay, but now it is repaired correctly.


While we were waiting on parts, the body work continued.  The photo to the right shows the front fender brace that was repaired and primed.  We have also been working on the inside of fenders.  They should be ready for final paint in a few days.


Later,
Tom McCurry

Wednesday, April 25, 2012

ENGINE WORK AND BODY WORK CONTINUE

The restoration is progressing quite well.  Today we continued the assembly of the engine.  The new water pump arrived and I installed it today.  The photo to the right shows the transmission after the finish has been applied.  Tomorrow, the oil filter mount will be installed.
At this point the engine, clutch and transmission is ready to be assembled.  Following the assembly, the final coat of paint will be applied to the engine and transmission.  


Paxton completed the assembly of the trunk lid this afternoon.  Epoxy primer will be applied tomorrow or Friday.  

Life is good!
Tom McCurry

Monday, April 23, 2012

A VISIT FROM TIM

Tim came by the shop today.  He delivered the body trim that had been re-chromed.  The chrome shop has done a great job.  We compared the finish on some of the pieces Tim had bought new with those that were re-chromed.  Aside from the fact that some of the new pieces were made of thinner gauge material,  the finish on  a few of them was not as bright as those that were re-chromed.  Fortunately, all the bright work has been received and is in good condition.  We will test fit all the chrome before applying any paint to the car.  We don't need any surprises.  
This afternoon we set the timing on the engine and adjusted the intake and exhaust valves.  Don finished cleaning the transmission case and the bell housing and I applied the finish coat before leaving the shop.  I will post more pictures tomorrow.

Later,
Tom McCurry

Tuesday, April 17, 2012

ASSEMBLING THE ENGINE

The fun has begun.  Assembling parts that are new or newly refinished is an absolute joy.  I just love this part of a restoration.  You can work all day and hardly get your hands dirty.  Today was spent cleaning and painting fasteners and assembling the intake and exhaust manifolds.  All the cleaning, repairing and repainting is beginning to payoff.  
The photo to the left shows the manifolds in place.  The carburetors, oil filter system, generator, starter and distributor will not be installed until the engine is mounted in the car.  

Paxton completed the welding on the trunk lid this evening.  The bottom edge of the lid was a rusty mess or as we often referred to its porosity, "Swiss cheese".  After the initial sandblasting was done, you could actually see through the bottom edge; hence, the name.  This repair has been rather time consuming, but the end result is certainly worth the time. 


Did I tell you I was having fun?
Tom McCurry


Monday, April 16, 2012

RE-ASSEMBLING THE ENGINE

A few days ago I applied the high-temp engine paint to the block and the oil pan and today the assembly began.  After assembling the motor mounts they were attached to the block and the rubber parts were masked so that the fasteners could be painted.  Next the inspection covers, or side covers, and the generator mounting bracket were attached.  Finally, the new oil pan was bolted in place.


Tomorrow the oil filter system, tachometer drive and exhaust and intake manifolds will be installed.  We had also intended to install the new water pump, but it was defective so we had to reorder.
Paxton continued working on the trunk lid and the welding is almost complete.  He is such a perfectionist.

I love this car...
Tom McCurry


Thursday, April 12, 2012

BODY WORK IN PRIMER

Today was a great day.  We began by putting the finish coats of paint on the "new" oil pan.  It looks great !  Check it out.  How do you like the color?  It is sort of a silver green.


While it was drying, I prepared the fenders and front cowl for primer.  It has been a bit cold here lately.  We actually had a little snow this morning so I had to wait until it warmed up in the shop before I could apply the primer.  Thought you might like to see the snow storm that just hit Hilton Head, SC.


Just kidding!  I was sandblasting some rusty parts outside.  Back to the painting.  I applied the epoxy primer to the fenders and front cowl.  It revealed a few small imperfections but the high build primer that will be applied next will eliminate them.  


The benefit of using black primer...it highlights every little imperfection.


Y'all come back now...
Tom McCurry

Wednesday, April 11, 2012

ANOTHER LATE NIGHT AT THE SHOP

I spent the day putting the finishing touches on the body work.  The fenders, doors, front cowl and hood are now ready for high build primer.  I also detailed the new oil pan. The original one was badly damaged and we were fortunate enough to find a good used one.  Aftermarket oil pans are not available.  The "new" one, shown in the photo to the right  is now ready for final paint. This will happen tomorrow.


Paxton was in the shop this afternoon and continued the trunk lid repair.  As you can see in the photo to the left, the repairs are nearing completion.  It was necessary to tack weld the repair panels in place and attach the lid to the body to make sure the margins between them were correct.  This must be done prior to stitch welding the panels in place.


More to come...
Tom McCurry

Tuesday, April 10, 2012

WORKED LATE TONIGHT

Paxton and I were in the shop late tonight working on the trunk lid.  In a previous post we discussed the necessary repairs.  I showed you a photo of the patch panels I had fabricated. In the photo to the right, Paxton is removing the rusted panel.  You can see two of the patch panels I made on the right side of the photo.  There are five panels in all and they will be installed one at a time in order to maintain their correct position.


The photo to the left shows the first patch tacked in place.


After the three lower patch panels were tacked in place, we test fitted the structural panel on the inside of the trunk lid to confirm correct positioning.
It was a perfect fit.


The corner pieces will be attached and all the panels will be stitch welded tomorrow.

Stay tuned,
Tom McCurry

Sunday, April 8, 2012

HAPPY EASTER EVERYONE

We didn't work this weekend because of the Easter Holiday.  We will be back at it tomorrow morning.  Completing the body work on the patches we installed on the fenders will be the first order of business.  
I have reserved the paint booth for the last weekend of the month.  We will be applying the final coats of red lacquer at that time.  Then the assembly of the suspensions and drive train will begin.

Color me excited,
Tom McCurry

Friday, April 6, 2012

RUST REPAIR ON TRUNK LID

We spent several hours today fabricating patch panels for the trunk lid.  The bottom edge of the lid was rusted in several places.  Yesterday, we removed the lid's lower structural panel, exposing the rusted areas.  The patch panels, shown in the photo to the right, will replace the entire bottom edge.  After the welding is completed, the welds will be ground down flush with the existing metal, filled and primed on both sides.  Then the structural panel will be re-installed.  Paxton will be welding the panels in place this weekend.  

Stay tuned,
Tom McCurry

Wednesday, April 4, 2012

PHOTOS OF THE NEW ENGINE


Don and I unloaded the new engine this morning.  We are so thankful for our hydraulic hoist.  Otherwise that 650 pound engine would still be in the back of my truck and we would be waiting on ten of our closest friends to help us.  


Shown in the photo to the left is the engine mounted on the stand.  This afternoon I began painting the areas of engine block that will be covered by the motor mounts, generator, starter and intake and exhaust manifolds.  A final coat of paint will be applied after the engine is assembled.  That is the way it was done in 1961.  


Paxton came over late this afternoon and welded the last patch panel in place on the fenders.  The only remaining patch panels to be installed are on the trunk lid and the bottom of the driver's door.  Then we make it RED.

I love this car...
Tom McCurry

Tuesday, April 3, 2012

THE NEW ENGINE IS IN OUR SHOP

It has been a few days since my last post.  I had to take a road trip to pick up the newly rebuilt engine.  There were a few delays in the rebuilding process mostly related to parts availability and delivery.  All the parts were received at the end of last week and the engine was assembled yesterday.  
The cylinder walls were damaged so it was necessary to bore the engine .030 over.  This was the only variation from the stock specification.  We will be attaching the engine to the stand tomorrow so that the assembly process can be completed.  
Look for photos on tomorrow's post.

Later,
Tom McCurry