DEDICATION

This blog is dedicated to the restoration of the Austin Healey 3000...among the most desirable of all British sports cars.

Wednesday, May 30, 2012

PREPPING FOR PAINT...AGAIN

I have scheduled the paint booth for Saturday...again.  Last week's problems have been solved and once again we are good to go.  
After rebuilding the generator, starter and distributor to original specifications, we refinished the housings.  They are now ready to be attached to the engine.  

Stay tuned...
Tom McCurry 

Sunday, May 27, 2012

PAINTING THE CHASSIS

Saturday morning we moved the Healey into the paint booth.  We spent over an hour cleaning the chassis.  A final coat of epoxy primer was applied to the entire chassis. Next the lacquer was to be applied.  


Jake, our painter, began to apply the lacquer and had a problem with the paint gun.  We completed the cockpit of the car and after inspecting the finish, decided to suspend the process.  
If the paint store is open on Monday, Memorial Day, I will buy a new gun and resume painting as soon as possible.


Hope Tim likes RED...
Tom McCurry


Friday, May 25, 2012

PAINTING THE CHASSIS TOMORROW MORNING

Well, it's finally here.  Tomorrow morning at 7 am we will be moving the Healey into the paint booth.  I spent the last two days sanding and applying seam sealer.  My fingers hurt.  
Every square inch of this car was "scuffed" to prepare it for the application of sealer and finish paint.


Seam sealer was applied between the frame rails and floor pans.  This will prevent water and dirt from being trapped there and greatly reduces the chances of rusting.  


The photo to the right shows the last of the patches that were welded in place today.  It was necessary to cut a small hole in each front wheel house in order to apply POR 15 to the inner rockers.  The inner rockers are now sealed inside and outside.  


Tomorrow morning it will be RED...
Tom McCurry


Wednesday, May 23, 2012

PREPARING FOR THE WEEKEND

If things go as planned, we will be painting the chassis on Saturday.  I am so excited!  I spent the day touching up the seam sealer and spraying the inside of the rockers with POR 15.  POR 15 is a rust preventative paint that encapsulates metal to prevent rusting.  There are so many areas on this car that are susceptible to rust.  Now that the POR is applied, the risk of further decay is drastically reduced.  Tomorrow I will be touching up primer and cleaning the surfaces to be painted.

Sorry, no pictures today...
Tom McCurry

Monday, May 21, 2012

TRANSMISSION IS IN PLACE


Have I told you lately how much I love this car?  Duh!  I am getting so excited.   We will be painting the chassis this weekend.  It will be RED...FINALLY!

Anyway, Don and I connected the transmission today.  In the past, aligning the transmission has been somewhat of a chore, but this almost fell together.  We were so impressed with our ability.  


After the bolts were started, Don tightened them to the proper torque setting in diametrically opposed sequence.  I finished the day installing the new slave cylinder and painting a few more small parts.


More to come tomorrow!
Tom McCurry

Sunday, May 20, 2012

TRANSMISSION READY TO INSTALL


I spent a couple of hours yesterday preparing the transmission for attachment to the engine.  The fasteners for the drive shaft universal joint were cleaned and fitted with new nyloc nuts.


The photo to the left shows the installation of the new throwout bearing.  Tomorrow morning, we put it together.  


Love this car...
Tom McCurry                                                                                                                     
                                                                                                                                      

Friday, May 18, 2012

FITTING THE CLUTCH ASSEMBLY

Yesterday, I received the pilot shaft from Moss Motors.  This morning, I fitted the clutch assembly to the engine.  All the necessary parts are inspected and staged.


First the plastic pilot shaft and the clutch disc are positioned on the flywheel.  A small amount of bearing grease is applied to the pilot shaft prior to inserting it in the engine.


 Next the pressure plate assembly is fitted to the indexing pins on the flywheel and the six bolts are hand tightened.
Now, the bolts can be torqued to 25 foot pounds.  The manual calls for the torque setting in inch pounds.  Convert inch pounds to foot pounds by dividing by 12.  Begin by tightening the bolts a half turn at a time in diametrically opposed sequence.


 Now that the pressure plate is bolted in position and torqued the pilot shaft may be removed.
Now the clutch assembly is properly installed.  The transmission will be fitted to the engine on Monday morning.


Stay tuned,
Tom McCurry

Thursday, May 17, 2012

FALSE FLOOR AND HEAT SHIELD IN PLACE


The floor pan and heat shields fit like a glove.  We used the new floor pan as a pattern for the heat shields.


The shields are adhesive backed and are a bit aggravating to install, but as you can see in the photo to the left,  they fit perfectly.  The large washers visible in the photo are used as thickness spacers for the seat mounts.  The thickness of the washers is the same as the thickness of two layers of the heat shield.


After the heat shields were installed, the false floor was attached.  It is held in place with spot welds and panel bond (a high tech adhesive).


We should be applying sealer and finish paint to the chassis next week.

Excited,
Tom McCurry

Tuesday, May 15, 2012

BEST LAID PLANS...

"The best laid plans of mice and men often go awry", and so it is with the restoration of this Austin Healey.  The engine has been rebuilt, cleaned, painted and partially assembled.  The same is true for the transmission.  The new clutch has been prepared for installation.  Where is the pilot shaft?
When fitting the clutch assembly to the flywheel on the engine, the splines on the clutch disc and the bushing in the center of the flywheel must me aligned perfectly.  Inserting a pilot shaft, which is an exact copy of the transmission's first motion shaft , through the clutch disc and into the flywheel bushing before tightening the clutch pressure plate, assures proper alignment of the clutch assembly to the engine.  When the clutch is properly aligned, fitting the transmission is less challenging.  Guess what is missing.
My first order from Victoria British included all the engine and suspension parts necessary to assemble the car's drive train; well, everything except the pilot shaft.  I ordered it this morning and it should be here tomorrow or Thursday.  My bad.
Don had the day off today so I spent most of the day running errands.  Tomorrow morning we plan to install the "false" floor pan and heat shield.  Hope this isn't another "best laid plan"...

Stay tuned,
Tom McCurry


Monday, May 14, 2012

PREPARING THE ENGINE FOR FINAL ASSEMBLY

With the engine partially assembled, the next step is to attach the clutch assembly and transmission.  We moved the engine to the assembly table as shown in the photo to the right..
The table is long enough to support the entire assembly.  Maintaining proper alignment of the engine and transmission during the assembly is difficult at best.  For that reason the engine has been strapped in position.  
After the assembly is complete, the final coat of paint will be applied.  Then we are ready to install the drive train.  
Soon, it will begin to resemble a car once again.  It is going to look soooooo good.

Love this car.
Tom McCurry

Sunday, May 13, 2012

ALMOST READY TO PAINT CHASSIS

The long awaited is almost here.  Just a few more finishing touches on the chassis and we will be ready to apply the sealer and finish paint.  But before the undercarriage can be painted, a critical issue  must be addressed.  
Healey 3000s have a major heat problem that adversely affects the driver's side of the interior.  It is most uncomfortable.  There are stories of the passengers on the right hand drive Healeys that actually put their feet out the window in an attempt to cool them off.  The heat issue is due to the location of the exhaust header, header pipes and muffler.  
When this car was manufactured, little was done to prevent the heat from the header pipes and muffler from reaching the driver's compartment.    The photo to the right shows the underside of the car on the driver's side.  If you look closely you will see two notches in the frame.  These notches allow the exhaust pipes and muffler to mount more closely to the floor of the car increasing the road clearance.  Looking closer, you will notice three holes in the floor pan.  These holes are for the driver's seat mounting bracket.  So, the driver is sitting on the muffler and his feet are just inches away from the exhaust header.  These temperatures reach several hundred degrees...and in traffic...in the summer.
But we have a solution. Pictured in the photo to the left is another driver's side floor pan the we purchased.  We have cut it to fit inside the car's framework under the driver's seat.  We will apply two layers of  a "high tech" heat shield to the bottom side of the existing floor pan and attach the new pan to the frame, "sandwiching" the shield between the identical floor pans.  No one will ever know the floor is insulated.
Next, after the interior is sealed and painted, we will apply another layer of the heat shield to the other side of the floor.  These shields will greatly reduce the temperature in the cockpit...just don't tell anyone what we did.

Stay tuned,
Tom McCurry

Tuesday, May 1, 2012

REPAIRING THE TRUNK STRUCTURE

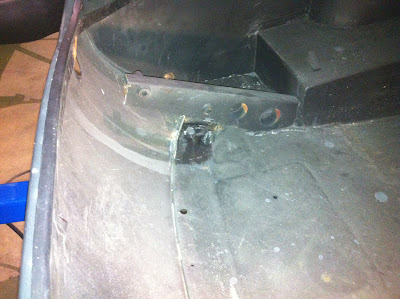
The trunk floor is an integral part of this car's structure.  There are several struts that connect the floor and the body panel support.  One of these struts had rusted at the welds and had separated from the trunk floor.  The photo to the right shows the small patch panel that was welded to the trunk floor.


The photo to the left shows the strut that was removed from the trunk frame and repaired.  The tabs on the end of the strut were fabricated and welded in place.


The strut is again fitted to the trunk floor and will be welded in place tomorrow after primer is applied to the underside.


Stay tuned...
Tom McCurry