DEDICATION

This blog is dedicated to the restoration of the Austin Healey 3000...among the most desirable of all British sports cars.

Tuesday, January 31, 2012

CLEANING THE UNDERCARRIAGE


After a careful inspection of the surfaces to be sandblasted, we decided to remove as much of the grease and rust as possible with a wire brush.  Since we are blasting outside and the media cannot be reclaimed, further cleaning with a wire brush can only save money and time. Pressure washing didn't clean the surfaces as well as I hoped.  Bill worked most of the day on the body and frame and about four more hours with the brush should finish the job.


Bill removed all the "felt" that was applied to the interior floor pans.


Don and I sorted all the parts into bins and checked off all the new parts that were ordered from Victoria British.  I finished the day, cleaning the grease that remained on the differential.  
Tomorrow, we will finish cleaning the car and the differential.  Hopefully the media for the sandblaster will be here and we can begin the blasting process.


Later,
Tom McCurry


Monday, January 30, 2012

DIRT AND GREASE REMOVAL

Cleaning a car underneath is usually an incredibly difficult task, however, with the car on the rotisserie, it was only a morning's work.  We sprayed the car with a degreaser first, let it stand for a half hour and pressure washed the entire car twice.  Surprisingly, after pressure washing the car underneath, most of the newly exposed surfaces were still coated with red paint.  Usually, a British car this age is severely rusted.  There are probably no repairs needed underneath.
While we were pressure washing, we also cleaned the differential.  Now it can be cleaned and painted much  easier.  
The sandblasting process will begin tomorrow.  Hopefully, by the end of the week, the frame will be in primer and the welding can begin.

Tom McCurry


Sunday, January 29, 2012

RECEIVED NEW PARTS

The restoration of the parts to be reused is nearing completion.  The differential and rear springs still need to be dismantled, repaired, cleaned and painted.  We are still cleaning and painting some of the engine parts, but their numbers are dwindling. 
The new parts arrived from Victoria British late Friday evening and I began to unpack them on Saturday morning. As we have done many times, on Monday morning we will sort the parts, both new and restored into plastic bins dedicated to a particular section of the car, i.e. rear brakes, rear suspension, front suspension, front brakes, engine, engine compartment and interior.  By doing this, the car can be built more efficiently.  
Stay tuned, the fun is about to begin.  

Tom McCurry

Friday, January 27, 2012

A VIEW YOU HAVEN'T SEEN

Bill and I spent most of the day cleaning and painting parts.  Bill, pictured above is cleaning the drive shaft and universal joints.  He does a great job.  It's a pleasure to work with people such as Bill and Don that take a great deal of pride in their work.
 We did take the time to make the final adjustments to the rotisserie so the car could be inverted.  As you can see in the photo above,  once the car is inverted it can be easily cleaned and repaired with minimal risk. As shown in the photo below, while the car was on its side, I used a die grinder with a fiber wheel to spot check the general condition of the frame and floors.  Notice the shiny metal under the red paint...that, is a very good sign.  Can't wait to clean and blast...Monday, if it doesn't rain.
    
I love my work,
Tom McCurry

Thursday, January 26, 2012

RESTORING PARTS

Don and I attempted to remove the bushings from the rear springs today.  We were partially successful.  One of the bushings came out easily and the others...I plan to do some clean-up work on them tomorrow in hopes that the bushings can be removed easier.  We will see.  
We pressed the steering arm off the housing this morning and later in the day, I cleaned, primed and painted the steering gear housing, column and arm;  a photo of which was shown on yesterday's post.
Tomorrow we will pressure wash the frame to remove all grease, dirt and loose rust in preparation for blasting.  

See you tomorrow,
Tom McCurry

Wednesday, January 25, 2012

CLEANING AND PAINTING PARTS

Now that we have stripped the car, some of the team is focused on cleaning and painting the parts that will be reused.  The old hubs turned out great.  You can see them top left in the photo to the left.  Bill cleaned them with the power brush and I painted them.  Some of these parts will never be seen by anyone but our team, but you can be assured that every part in this car will be reconditioned if possible and replaced if not.


As shown in the photo to the right, Bill removed the grease and paint from the steering box.  It was pretty heavy and difficult to manage but Bill did a great job on it.  I will paint it tomorrow.


The beat goes on....
Tom McCurry  

Tuesday, January 24, 2012

FINISHING TOUCHES

I guess the title is a bit misleading, but we spent the day "tying up the loose ends" before the car is sandblasted. The bolts securing the rear leaf springs were rusted and difficult to remove.  Almost four hours were devoted to removing the springs.  Now the leaf spring bushings will be "pressed" out and new bushings installed as a part of the refinishing process.


Pictured to the left, is my friend Bill.  He is in charge of cleaning and sandblasting parts.  In this photo, he is removing one of the steering gear mounting bolts that was fused to the aluminum housing.  His talent is exceeded only by his patience.  


Don spent the afternoon cleaning the floor pans.  As you can see, in the photo below, they are in incredible condition; no rust at all. 


This afternoon, I painted the parts Bill had cleaned this morning.  

Enjoy,
Tom McCurry

Monday, January 23, 2012

READY FOR SANDBLASTING


Don and I had a very productive day.  After the rotisserie setup was completed, the removal of the rear suspension and differential began.  Almost every fastener was difficult to remove.  Most of them had to be removed with a die grinder. By the end of the day,  we had everything but the leaf springs removed, bagged and tagged.


When the differential was removed, it was placed on jack stands where the axles will be pulled, bearings and seals replaced and the housing cleaned, primed and repainted.
Now that car has been stripped to the frame, it is ready to be cleaned, sandblasted and soda blasted.  It is best to soda blast painted surfaces because it will remove the paint without harming the metal surface, however it will not remove rust.  The cars structure will be sandblasted.  This will remove all the rust, highlight any imperfections which will require repair and prepare the surface for primer and paint.

Tomorrow, the parts we removed today will be sandblasted and prepared for repainting.  In the next few days the car's structure will be moved to the sandblasting shop.  By the time the paint and rust removal is completed, the body panels I ordered this past weekend will arrive and the body repairs will begin.

Stay tuned,
Tom


Sunday, January 22, 2012

BACK IN TOWN

We just got back in town from delivering the engine and transmission to the machine shop.  We will pick them up in 4 weeks.  At that time we will apply the final finish, install some of the peripheral equipment and prepare the engine and transmission for installation.  
This should be an interesting week.  We now have the car setup on the rotisserie and will begin to remove the differential.  It will be much easier now that we can elevate the car and have better access to the springs, sway bar and drive shaft connections.
Look for pictures tomorrow.

Later,
Tom

Friday, January 20, 2012

DELIVERING ENGINE TO MACHINE SHOP TODAY

Since this car has been in storage for over 40 years, we thought it was necessary to have the engine and transmission checked out.  We are taking the engine to a machine shop that specializes in rebuilding vintage engines.  Tim wants the drive train to be restored to its original specification.  The engine cylinder tolerances will be checked and machined if necessary.  New bearings will be installed throughout.  The pistons will be checked and new rings installed.  Most importantly, the engine will be balanced, meaning all like moving parts will be machined to  the same weight.  This makes the engine run smoother and last longer.
The transmission will be completely dismantled, all tolerances checked and reassembled with new bearings and seals.
This process will require about a month, hopefully just in time to be put back in the car.  We will see.

Stay Tuned,
Tom

Thursday, January 19, 2012

THE HEALEY IS ON THE ROTISSERIE !

Finally !  We completed the mounting process.  It was a bit difficult, but it always is.  It was a new rotisserie frame and required some alteration.  These frames are usually mounted to the bumper mounts which are traditionally attached to the car's frame.  This car had no such usable frame attachments.  Annoying but not insurmountable.  It was necessary to fabricate an additional outrigger for the rear end of the car.  
Aside from the rotisserie struggle, we packaged all the newly painted suspension parts and put them in a secure place.  Now  we are ready to lift the car, remove the rear axle and begin the cleaning and sandblasting process on the frame.  Pictures will follow on Monday.
Tomorrow we will be delivering the engine and transmission to the machine shop for assessment and the necessary repairs.

Party on,
Tom


Wednesday, January 18, 2012

SETTING UP THE ROTISSERIE

After we purchased the U-bolts needed to mount the car, we raised the front of the car with the floor jack and moved the rotisserie into place.  As shown in the photo to the left, the frame of the car and rotisserie frame were joined with the U-bolts and two inch angle iron gussets.  Another set of U-bolts will be installed adjacent to the ones shown just for added protection.
The rotisserie frame will require some alteration to adapt to the rear of the car.  Two 32 inch sections of box tubing will be connected to the rotisserie frame and then bolted to the car frame.  Two sets of U-bolts will be used on the rear also. Setting up a car on a rotisserie may seem like a lot of trouble, but the benefits of having the capability of revolving the car to any position greatly out weigh the time spent.  Just think, now the welding on the rocker panels, inner fenders and "dog legs" can be done in a standing position. The body work will be much easier also. We are almost there!
Bill spent the day sandblasting parts and I cleaned, primed and painted them at the end of the day.  Now all the front suspension parts have been refinished.  These parts will be stored and installed when the final finish has been applied to the frame.

Talk with you tomorrow,
Tom


Tuesday, January 17, 2012

MORE ON THE ROTISSERIE

As Elmer Fudd would say, "I'm weady for some west and wewaxation".  Don and I have been all over that Healey today...not easy for two old men, but we did it.
Don began the day by continuing to remove the front suspension.  One of the A arms was a bit stubborn and the  fasteners had to be ground off and punched out.  Part of the steering gear is also firmly rusted in place.  We made some headway on that but finally had to do something else for a while.  I continued the cleaning and painting process on the suspension parts.  They are looking great.
We moved the rotisserie into place and began to align it with the car.  Paxton and Robert came over to "supervise" and now we have a good game plan for tomorrow.  Bill will be back in the shop tomorrow with more cleaning and sandblasting.  I will purchase the necessary U-bolts and backing plates to attach the car to the rotisserie and maybe get some of that completed.
Sorry there are no pics...I forgot the camera again.

Later,
Tom

PS  This post is driving spell check crazy...LOL

Monday, January 16, 2012

SETTING UP THE ROTISSERIE

We spent the early hours today removing and sandblasting suspension parts.  I'm still wrestling with one of the A arms that doesn't seem to want to let go.  I gave it another bath of penetrating oil before I left today.  Hope that works.
The rest of the day was spent setting up the rotisserie.  Tomorrow, we will move it into position and begin bolting it to the frame of the car. I can't wait to turn it upside down.  This rotisserie will make this job so much easier.  I will post some photos of it when we have it set up.

Stay tuned,
Tom

Sunday, January 15, 2012

A DAY OF REST AND PAPERWORK

My body needed a rest today.  I really wanted to work on the Healey today,  but it just wasn't in me.  Instead I worked on the parts list.  Tim had sent me a list of parts this past week that he wanted to replace.  I spent the day adding to his list the parts we will need to replace rather than restore.  In all there were sixteen pages.  Although it is not a complete list, it is close.  I emailed it to Tim this evening...hope he survives the "sticker shock".
Back to work tomorrow.

Tom


Saturday, January 14, 2012

MORE SUSPENSION WORK


We spent today removing the swivel axles, hubs, springs and spring pans.  Most of the fasteners were fused together.  Some of these suspension parts will require replacement but most of them can be saved.  The suspension parts to be restored will be sandblasted on Monday morning and painted that afternoon.  
Notice that the shock absorber is in the "loaded" position...meaning it must be rebuilt.  We anticipated rebuilding both front and rear shocks.  They will be sent to Apple Hydraulics.


Stay tuned,
Tom

Friday, January 13, 2012

RESTORING THE PARTS


There are a tremendous number of  parts that need to be restored on this car.  The parts must first be cleaned to remove grease and loose corrosion. It is important to keep debris out of the blasting media. 


Next the parts are sandblasted and cleaned to remove any dust and grease.  Now primer can be applied and allowed to dry thoroughly.


Lightly "scuff" the primer, clean again and apply the final color.  Several finish coats may be required.  Pictured to the right is the part after the finish is applied.


Pictured below is the first of the restored parts...many, many more to come.

Later,
Tom
.

Thursday, January 12, 2012

DISMANTLING THE FRONT SUSPENSION

In the photo to the right , it is difficult to see how much of the front suspension has been removed.  The sway bar assembly, steering link, ball joints and brake calipers have all been relocated to the restoration table.


Tomorrow we will remove the swivel axle assemblies, springs, shock absorbers and A arm assemblies.  Hours of sandblasting, priming and painting will be required to make these parts look like new again but the end result will be worth it.  It will be very important to determine the original color of  these parts...attention to the details.

Tom

Wednesday, January 11, 2012

MORE ENGINE WORK

After I removed the generator, mounting bracket and the slave cylinder,  I separated the engine and transmission.  The only problem I found was a broken generator mounting bracket.  It is made of cast iron and will require replacement. 
The engine and transmission are greasy from the years of neglecting minor oil leaks.  You know what they say; "If it is made in the UK, it probably leaks."  We will fix that.  We will begin cleaning the transmission tomorrow.  The engine will be cleaned by the machine shop prior to the rebuilding process.
I spent the rest of the day sandblasting and priming the engine mounting brackets.  They will be painted tomorrow.

Have I told you lately that I love my work?

 ILCUAL8R,  (was once my vanity plate)
Tom

Tuesday, January 10, 2012

REMOVING HYDRAULICS AND ELECTRICAL WIRING

Don and I had a very productive day in spite of all the rusted fasteners we encountered.  By the end of the day the engine compartment was completely stripped of all wiring and hydraulics.


The fuel tank, pump and lines had been removed from the trunk...note the absence of rust in the trunk space.


While Don sandblasted some of the parts to be restored, I removed the intake and exhaust manifolds, starter and motor mounts.  Tomorrow, the generator, water pump and transmission will be removed.

Tune in tomorrow,
Tom

Monday, January 9, 2012

ENGINE AND TRANSMISSION REMOVED

Tim joined us today for the engine removal.  We spent almost an hour setting up the hoist, draining fluids and making the final disconnections on the motor and transmission.  The entire removal process took about three hours.
We took very few pictures during the removal process because we had to watch the engine's movements very closely.  Re-installation of the drive train will be more difficult that the removal.  We must be very careful not to mar the new finishes.  To make the installation easier, all the peripheral equipment such as the generator, starter, exhaust and intake manifolds and water pump, will be attached after the engine is in place. 
With the engine and transmission removed, the hydraulic system, fuel system and wiring harness can be removed more easily. Tomorrow the engine compartment will be stripped and the engine and transmission will be separated.  

Later, 
Tom


Friday, January 6, 2012

READY TO PULL THE ENGINE

This has been a day of preparation.  We have disconnected the wiring and "plumbing" connections on the engine.  The fuel tank has been emptied and the carburetters and linkage removed.  The exhaust header was also disconnected.
The shop has been cleaned and organized and the engine hoist has been setup.  Monday morning the motor and transmission mounts will be disconnected and removed from the car.  
From there, the engine will be stripped and delivered to the machine shop for balancing and blueprinting and the transmission will be torn down and rebuilt to its original specification.
The frame will be sandblasted to remove all paint and rust and a light primer coat applied in preparation for the necessary welding. 

Stay tuned, this is exciting.  
Tom


Thursday, January 5, 2012

DISCONNECTING THE ENGINE & TRANSMISSION

We spent most of the day preparing the engine and transmission for removal.  All electrical lines and water lines were disconnected.  The heater core, windshield wiper motor and transmission tunnel were removed and the sheet metal heater box was sandblasted in preparation for refinishing.  

I appreciate the manner in which the transmission and engine are mounted in this car.  The mounts and universal joints can easily be disconnected from above.  Even the speedometer cable can be removed easily
We are on schedule for removing the engine and transmission on Monday.

Tom

Wednesday, January 4, 2012

REMOVING THE COWL AND DASH


Today's tasks were a bit easier.  We began by removing the cowl; something I was not looking forward to since this project began.  As it turned out, it was probably the easiest of all the panels...no rusty fasteners at all.


To the right, pictured is the one piece cowl or front shroud.  It is solid aluminum and in excellent condition.  There are two small dents in the front of the cowl and now that it has been removed from the car it can be "worked" more easily.

 It probably took longer to remove the steering wheel than anything else we did today.  The adjustable steering wheel was rusted to the column making it difficult to remove.  Once the wheel was off the car, the dash was easily removed.  With the dash detached, the gauges and switches could be easily  disconnected and labeled.
Tomorrow, we will begin disconnecting the engine and transmission.  The engine will probably be pulled on Monday if everything goes well the next two days.


Stay tuned,
Tom


Tuesday, January 3, 2012

REMOVING THE REAR FENDERS


 The rear fenders were difficult to remove.  There are probably ten small screws attaching the fender to the rear door jamb and they were all fused together with rust.because of their location inside the rear wheel well.   


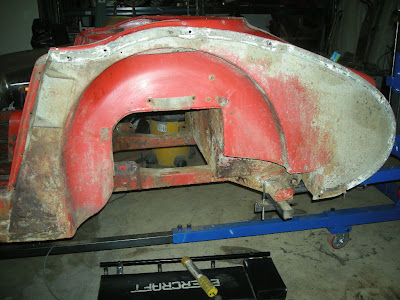
Pictured to the right is one of the few concentrations of rust on this car..  This is another one of those areas that was not properly sealed from the factory. As a result, dirt and moisture was trapped between the fender and structure.  Repairing this area will require new patch panels.  Fortunately they are available from the UK and are a perfect fit...no after market parts for this car.


Tim will be visiting the shop soon...hope he recognizes his car.

I love my work,
Tom


Monday, January 2, 2012

THE FENDERECTOMY


Don and I had so much fun today.  It was after six pm before we realized it.


Most of the day was spent removing the doors and front fenders.  It wasn't particularly difficult, just time consuming.  Some of the fender fasteners were very difficult to access.  You had to be a contortionist to remove some of them.  Re-installing the fenders will probably be an even greater challenge.
If you will notice, there are many struts and supports located behind the fenders.  These areas are actually unprotected from the elements.  Road spray and dirt can easily find its way behind the fenders and be trapped there for the duration.  There are drain holes in the bottoms of the fenders, but flushing them out could be a problem if there is any build-up of dirt at all.  We found between three and four gallons of sediment behind the fenders.  It is imperative that we design some way of shielding this most vulnerable area.  And they wonder why these cars tend to rust...duh.

You will also notice in the photo above, how the vent line to the cockpit has collapsed from the moisture.  It is easy to replace this line with the fender off, but it will probably take a considerable amount of time if you try it from inside the engine compartment.  
Had this car not been in dry storage and had been on wet roads for the last 41 years, it would not be in such good condition.  In spite of the dirt behind the fenders, there was hardly any damage to the framework...dry dirt vs wet dirt.
Tomorrow, we will be removing the cowl and rear fenders.  

Join us,
Tom


Sunday, January 1, 2012

REMOVING THE FENDERS

Now that the holiday is over, it's time to get on with the restoration.  Tomorrow morning we will begin to remove the fenders.  They are attached with a number of screws most of which are in awkward places.  Most of the fasteners we have encountered thus far have not been fused together with rust, but since these  particular bolts are located inside the wheel wells, there is a good possibility some of them will be very difficult to remove, and that takes time and patience.  
After the fenders are removed, repairing the rust will be much easier.  All the necessary welds can be cleaned and painted on both sides, greatly reducing the chance of the rust recurring.  Also, the frame and all the body structure can be easily inspected and any problems corrected.  
When these cars were built, the frames and body structure were not painted very well.  In fact, from my inspection, there is very little paint remaining in these areas.  Having the cars structure on a rotisserie will allow all the surfaces to be cleaned, primed and painted more easily.
Well, take a good look.  After the fenders and cowl are removed this car will more closely resemble a pile sheet metal.

Stay tuned,
Tom