DEDICATION

This blog is dedicated to the restoration of the Austin Healey 3000...among the most desirable of all British sports cars.

Tuesday, July 17, 2012

WHAT'S NEXT ?

Now that the power plant is in place, we are focused on installing all the peripheral equipment.  We are making an effort to getting this car running in a week or so.  
I began the day by attaching the generator.  The bracket shown on top of the generator is for the coil.


The black canister shown in the photo to the left is the reservoir for the hydraulic brake and clutch systems.  Notice the label.  It is the correct decal for the reservoir. 
After the slave cylinder that operates the clutch is connected, both systems are ready to be "bled".   At that point, we can stop the car but we still can't make it go.


Life is good,
Big Healeys are BAD !

Tom McCurry

Monday, July 16, 2012

ENGINE AND TRANSMISSION INSTALLED

This has been the perfect day.  I have never had so many things go right on a Monday especially when an English sports car is involved.  By noon we had installed the engine and transmission.  It isn't always that easy, but certainly note worthy when the process goes smoothly.
The photo to the right shows the engine and transmission attached to the hydraulic hoist and the Healey prepared for the installation.


In a matter of only a few hours, power plant was bolted in place.  The best part...only one small scratch.  You will notice, in the top center of the photo to the left, we used a  device that allowed  us to tilt the engine 45 degrees.  This made it much easier to maneuver the engine to its proper location.


The transmission is attached to the frame by the rear mounts.  There is also a tie-rod connecting the transmission to the frame.  It cannot be installed until the car is once again lifted off the floor.


Now the engine and transmission is properly fitted to the car.  The carburetors, linkage and fuel lines have also been connected.


Tomorrow, the installation of the generator  and engine wiring will be completed.

It's coming together...
Tom McCurry

Please direct questions and comments to tommystoplesscars@yahoo.com

Sunday, July 15, 2012

ANOTHER BEFORE AND AFTER

I enjoy posting the before and after photos.  It's a reminder of what neglect can do to an automobile and a testimony to hard work.  Shown in the photo to the right is the engine compartment after the engine and transmission was removed.


After many hours of sandblasting, cleaning, painting and refitting, we have a "new" engine compartment.  Yes, it is the same Healey.


Stay tuned...
Tom McCurry

Saturday, July 14, 2012

MOUNTING THE FUEL TANK

The fuel tank and the interior of the trunk, or boot, have been finished with urethane paint.  The fuel tank was in excellent condition.  Evidently the fuel had been drained when it was put in storage...a very good thing.  Gasoline tends to "varnish" after a period of time and will cause problems with fuel pumps and carburetors.  If you need to store your vehicle for an extended period of time it is best to completely remove fuel from  the fuel tank, pump and carburetors.

 After the trunk space was painted, the foam seal was applied to the opening in the floor.  The fuel tank drain is exposed to the underside of the car through this opening.  You will also notice the new battery cable on the right side of the photo that has been routed from the front of the car. 


The fuel tank will be mounted on Tuesday.  Monday, we will have a busy day installing the engine and transmission.  We are prepared.

Love this Healey...
Tom McCurry


Friday, July 13, 2012

ARE YOU SITTING DOWN...

Although it was another hot day in Hilton Head, we accomplished a great deal of work.  This morning, we installed the new battery cable.  It is clamped to the frame just below the brake line and routed to the battery location in the trunk or "boot".


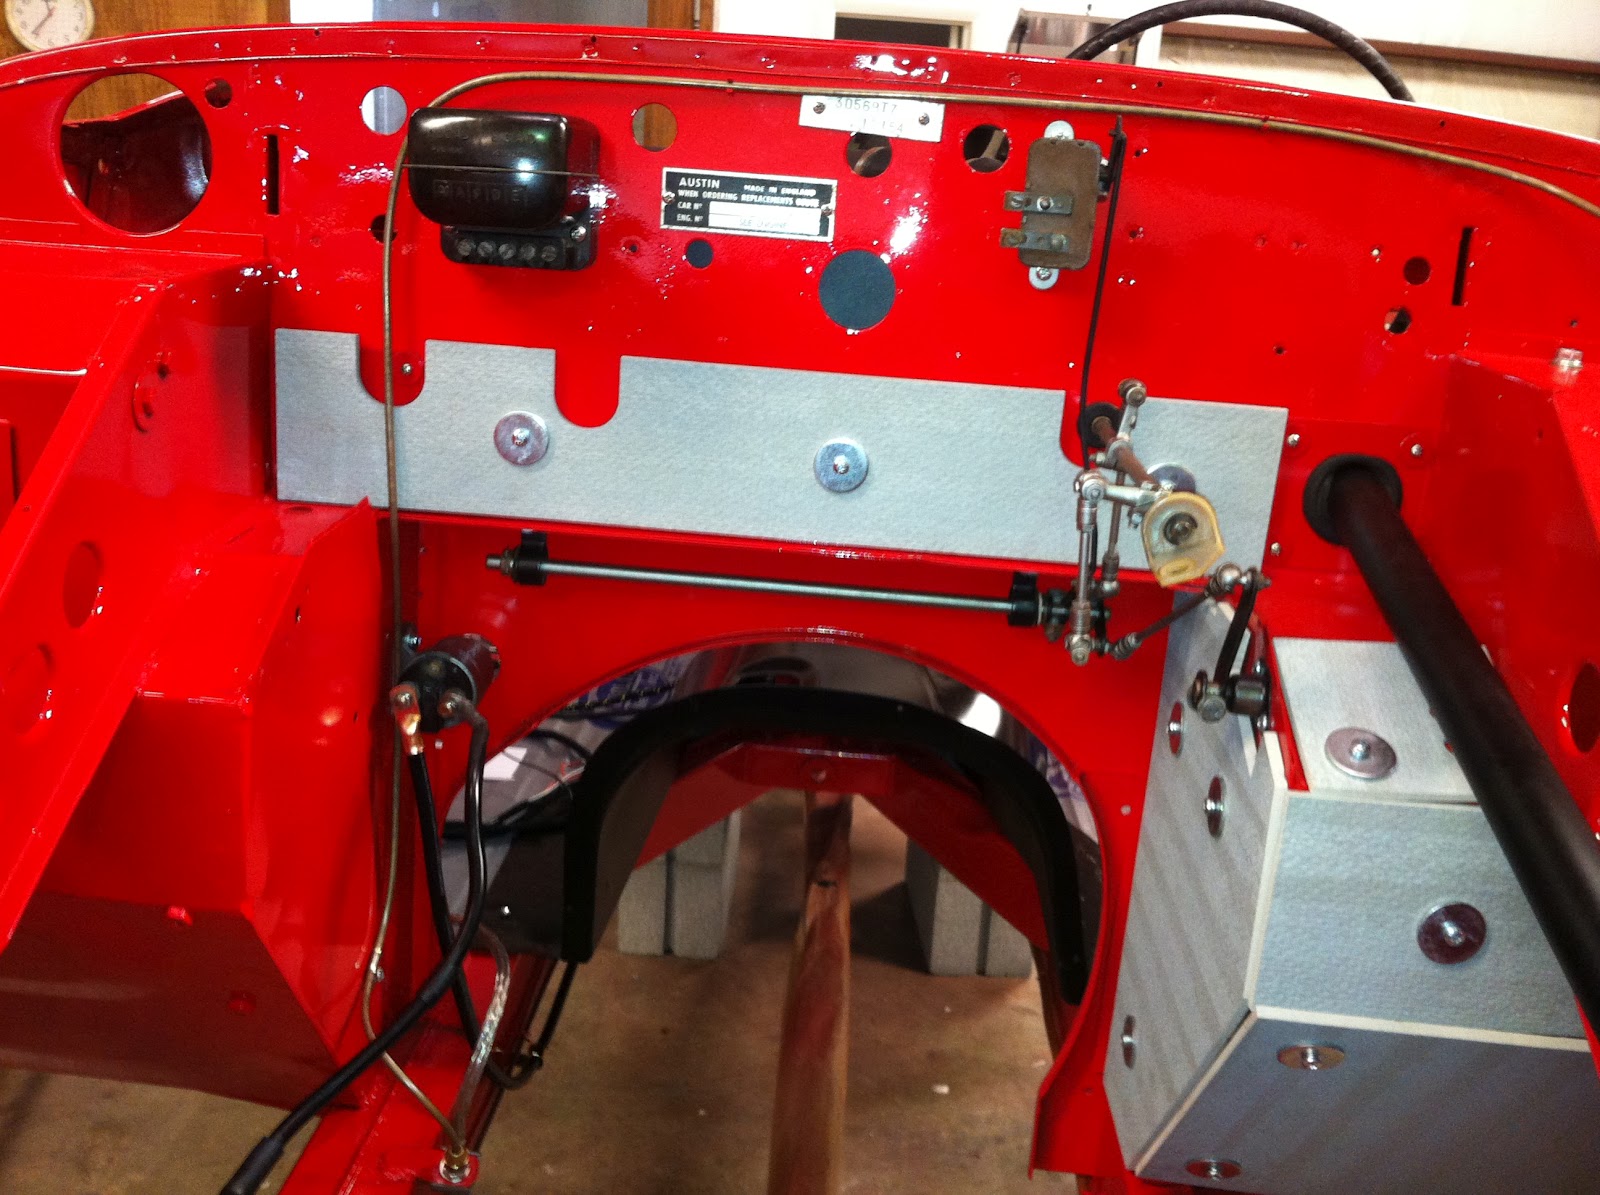
We installed several of the electrical components as well as the body tags to complete the preparation of the engine compartment to receive the engine.  The heat shields are in place as well.  


Now, for the moment you have all been waiting for.  We fitted the wheels to the axles, lowered the Healey to the floor and removed the rotisserie.  


It's beginning to look like a classic Healey again.  The Healey appears to be so low and sleek now that it is on the floor.  I suppose that is because we have been working on it at eye level for several months.


Tomorrow, I will be installing the fuel tank and straps.  All the components have been refinished so the installation should not be time consuming.  


On Monday morning, we plan to install the engine and transmission.  The body work and paint work on the fenders and doors continues.  

I remain excited...
Tom McCurry


Thursday, July 12, 2012

INSTALLED FACTORY HEAT SHIELDS AND PEDALS

Although it was over 100 degrees in the shop today, we managed to put in a full day of work on the Healey.  Tim had purchased a complete set of factory reproduction heat shields for the engine compartment.  
You can see in the photo to the right that the panels do not fit perfectly, but neither did the originals.  The reproductions are an exact copy of the originals.


We also managed to finish the installation of the brake and clutch pedals.  We virtually destroyed the connecting shaft and bushings when we dismantled the assembly but the parts were readily available.  At any rate the assembly is now operable and the system is ready to "bleed"


After we install the battery cable, the starter solenoid and the wiring harness, we will be ready to put this Big Healey on its "feet".  This will happen on Friday.  Can't wait...can you?
By the way, I have installed a link to my email address in the upper right hand corner of this blog page. I invite your questions or comments.

Life is good,
Big Healeys are BAD.
Tom McCurry

Wednesday, July 11, 2012

WHEEL ALIGNMENT

Before we drop the Healey on its "feet", we completed a "rough" alignment.  With the wheels off the ground, the alignment process is much easier.  We set the "toe" simply by measuring the front and rear of the wire wheels.  
Now the front suspension and braking system is complete.  With the rear suspension also complete, we are prepared to mount the wheels.  We will use the original ones only to make the final cleaning process easier.


I have installed a "contact us" link on the page.  We invite your questions and comments.

Looking good...
Tom McCurry

Tuesday, July 10, 2012

FITTING THE WINDSHIELD WIPER MOTOR

The wiper motor was in excellent condition and required only cleaning and new fasteners.  The installation was uneventful...for a change.
The wiper motor fits behind the dash.  It is truly a shame to hide it.


Love this Healey...
Tom McCurry

Monday, July 9, 2012

INSTALLING THE HEATER/DEFROSTER ASSEMBLY

After completely reconditioning the heater, including replacing the heater core, we fastened it into place today.  All new fasteners were used because the originals were rusted and were destroyed during the removal process.  The corrugated hoses connect the heater box to the defroster vents.


The screws shown in the lower left quadrant of the photo above connect the heater box to the ductwork that extends the width of the car.  The polished stainless steel vents, shown in the photo to the left,  fit underneath that duct.  There is one vent for each side...not a great deal of air flow.


Stay tuned...
Tom McCurry

Saturday, July 7, 2012

INSTALLING FRONT BRAKE CALIPERS

After rebuilding the front disc brake calipers, we mounted them on the swivel axles.  The new brake lines were fabricated and attached to the flex lines and calipers, shown in the photo to the right.

Now the suspensions, front and back are complete.  Next the wheels will be attached. We are all looking forward to seeing this car on its wheels.


The clutch and brake master cylinders are now permanently installed and the hydraulic lines attached.  


Life is good,
Big Healeys are BAD...
Tom McCurry

Friday, July 6, 2012

INSTALLATION OF ACCELERATOR LINKAGE

This is a very complicated accelerator linkage.  On later cars, all this linkage was replaced by a bicycle cable from the accelerator pedal to the carburetor and a short linkage connecting the two carburetors.  This has "engineering overkill" written all over it.
The photo to the right shows the accelerator pedal after it has been refinished and installed


In the top right section of the photo to the left you will see the connection of the accelerator pedal to the relay shaft.  The relay shaft is shown in the center of the photo and is hung from the underside of the firewall.  I suppose it was designed in this fashion to easily adapt to right hand and left hand drive cars.


The linkage is connected to the engine by means of the throttle relay shaft, pictured to the right, secured by a rubber grommet in the firewall.  When the engine is installed the nylon pillow block on the opposing end of this shaft is connected to the intake manifold.  This system is actually pretty cool.  A bit complicated, but cool.


I plan to work tomorrow installing the front brake calipers.  This will complete the installation of the front suspension.  We will be fitting the wheels next week in preparation of installing the engine and transmission.
Stay tuned, this car is really going to change in the next couple of weeks.

Tom McCurry

Thursday, July 5, 2012

PAINTING THE FUEL TANK AND TRANSMISSION TUNNEL

The fuel tank is in exceptional condition to be 51 years old.  There was no rust whatsoever on the outside and the inside was almost pristine.  Evidently, the fuel had been drained before the car was put in storage...a really good thing.  The tank has been flushed, stripped and painted with epoxy primer and semi-gloss black urethane paint.  It should be good for the next 51 years.

 A portion of the bottom of the fuel tank is exposed to the elements, however is was still in excellent condition.

 The transmission tunnel, shown in the photo to the right has also been stripped and painted.
The fasteners  have been located and the tunnel is ready for permanent installation, but it must be removed in order to install the engine and transmission.  The tunnel will be refitted before the carpeting is installed.


Tomorrow, we will be attaching the carburetor linkage, starter solenoid and engine compartment heat shields to the firewall.  This Big Healey will be on its wheels very soon.

Love this car...
Tom McCurry 

Wednesday, July 4, 2012

FINISHING THE HEAT SHIELD APPLICATION

 Although it is July 4, Don and I met at the shop early this morning to complete the installation of the interior heat shield.  In the photo to the right you will notice the foot wells have been covered with exception of the outside wall.  Only the areas between the engine, transmission and exhaust require protection from heat.
We also covered the driveshaft tunnel and bulkhead behind the driver's seat.  There is no need to cover the platform to be fitted with the back seat upholstery panels.  
The installation of the heat shield, which was purchased from NAPA Auto Parts,  is now complete.


Stay tuned,
Tom McCurry

Monday, July 2, 2012

APPLYING HEAT SHIELD

This heat shield will make a huge difference in the temperature inside the Healey.  As I explained in a previous post, the exhaust system is routed directly below the driver's seat.  This can make the Healey 3000 driving experience most uncomfortable especially on a hot summer day.  


As you can see in the photo above, the heat shield has been applied to the floor pans.  Only a few more panels are to be fitted before the job is complete.  The remaining panels will be installed Wednesday.
Also you will notice the black transmission cover has been positioned in order to locate the fastener holes.  It will be removed tomorrow and the finish paint applied.  

You gotta love Big Healeys...
Tom McCurry